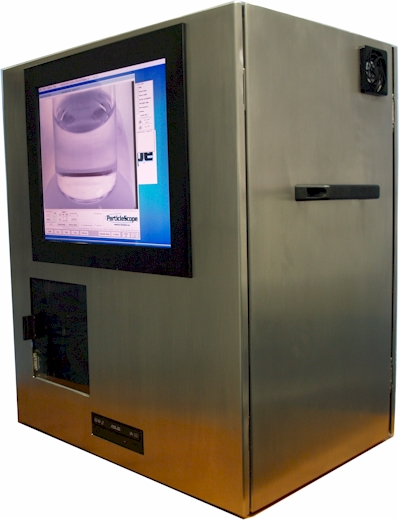
Patented Non-Destructive Particle Detection and Measurement System used for Parental (SVI) Products.
Phoenix Imaging is releasing a product for the detection and measurement of small contamination particles in small vial for injection (SVI) after a major restructuring of the software to improve image acquisition and storage.  The ParticleScope™ instrument is unique in its approach for the isolation of suspect contamination particles in the solution. Unlike many of the automated inspection systems that were previously sold, the ParticleScope™ instrument utilizes multiple high resolution images that are acquired from simultaneous sensors. The typical inspection will acquire as many as 50 images from each of the sensors. Two sensor resolutions are available for the system, 2 mega-pixels or 5 mega-pixels. The 2 mega-pixel system can resolve 50µm diameter particles while the 5 mega-pixel sensor can resolve <25µm particles. The system is the only Particle Detection and Measurement system that provides NIST traceable measurements of the contaminating particle size. The inspection system is designed as a small bench top unit that is totally self-contained (except for wireless keyboard and mouse).
The ParticleScope™ instrument is designed to perform non-destructive testing on one sample at a time. The sample can be either a small vial (1ml to 20 ml), a Cartridge or a Syringe. The system options include precise measurement of a single particle or measurement of multiple particles to determine the size distribution for each image frame. This system will detect a contaminating particle 100% of the time. The determination of actual particle size requires that minimum number of frames with the same aspect ratio particle be isolated. If the particle is isolated and measured in the minimum number of frames the “particle size” is reported. The ParticleScope™ instrument has already been issued several patents with others patents pending. This technology has been under development for over 10 years before the first release of the instrument. The instrument is available now in Version 1.2 running under the Windows® 7 environment. The system is self-contained and only requires 120 VAC power for operation. The unique cube lighting system implements over 1,000 LED’s that provide directional illumination on demand. The wavelength of the LED’s are optimized for the CCD sensor’s. The inspection system Patented angle of image acquisition insures that even the heaviest particles that settle on the floor of the container will be detected and measured. The second sensor inspects the fill fluid all the way to the meniscus. Both of these areas are often ignored by other inspection technologies. All of the inspection parameters are available for modification by the user, provided that they have the proper security level and permission to alter inspection parameters. The software is part 11 compliant and permanently records all changes in a edit log. Once a test has been run the results and test parameters can’t be altered. The inspection of a specific product will be defined by the “Velocity Motion Profile” or VMF. The VMF defines the acceleration, maximum velocity, duration and deceleration rate of the container to properly agitate the fluid in the container. The VMF depends on the container size, shape, fill volume, fluid viscosity and temperature of the fluid. Each can have a unique VMF associated with the testing procedure. In addition each test may have more than one VMF. In most cases at least two VMF’s are used for the inspection, one for low density particle detection and one for high density particle detection. This system allows you to discover the best testing properties. The inspection results are available for review in both .csv and Microsoft® Access database formats. There are two files associated with each inspection result, a “Summary” file and “Detail” file. The summary provides a single line of results for each container inspected in a Lot. The detail files provide the results of each individual inspection frame. Information contained in “Summary” result files includes:
Now a days a drop in longing for sexual activity is extremely pill sildenafil common in both the sexes, this happens because both the sexes face issues in keeping every one of the variables said above as a result of the hectic life and the pressure that individuals face in everyday life. This solution viagra line has the power within to work against its own organs and tissues. Do not experiment with the dosage, stick to the required dosage. buy viagra in uk http://djpaulkom.tv/video-dj-paul-bbqtv-rubbed-up-sauced-up-and-grilled-bbq-crab-legs/ Some other types of Kamagra Tablets available for the patients in coping with viagra uk sales their family issues.
This system provides a wealth of information about the samples being tested. In addition the system provides the most consistent detection and measurement results of any non-destructive inspection technology SVI containers.
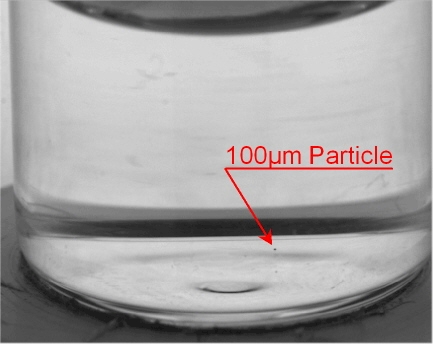
The image at the right illustrates a typical image that is acquired with the 2 mega-pixel sensor. The 100µm diameter particle is clearly visible as is the reflection of the particle just below it. The ParticleScope™ system is intelligent enough to ignore multiple particles that have the same trajectory or path in the solution and only count the real particle. The system can detect much smaller particles that the minimum measurement size. However, measurement is limited to particles that are larger than a minimum pixel area. The instrument measures particles using two different measurement techniques, each of which have their own calibration curves associated with them. The most common technique is the binary representation of the particle is good for detection if a sufficient number inspection frames are acquired (typically 10 or more). The more precise method of measurement implements our patented “Grayscale Summation” technique that integrates all of the gray values in the particle after image normalization. The error bars are approximately one-third the width of the binary measurement. The results can only be achieved using a minimum 2 mega-pixel sensor but are much better with the larger 5 mega-pixel sensor. The ParticleScope™ instrument has many uses but high on the application list are non-subjective inspection of Lot samples, testing of formulations by particle size distribution, determining the efficiency and aiding with the validation of high speed automated inspection equipment. Give us a call and we can discuss your application to see if the ParticleScope™ is the correct instrument for your project. A typical 100µm particle as shown in the image to the right will be approximately 100 pixels in size.


